Running a stocktake
Available on: Pro Plus.
A stocktake counts your physical stock, compares it against Shopify's on-hand quantities, and pushes the corrections back to Shopify in one step. Every adjustment is logged, so you have a record of what changed and why.
Stocktakes need inventory write access. The first time you open Stocktakes , Stockie asks for it. Someone who can approve app permissions for the store has to grant it, or the count cannot update Shopify at the end.
Full stocktake or cycle count
Choose before you start. It decides what happens to products you do not count.
Cycle count is the default. It updates only the products you count, and uncounted products keep their Shopify quantities. Use it for rotating counts, spot checks, or counting one vendor or category.
Full stocktake updates the products you count and sets uncounted products to 0. Use it for a wall-to-wall count where the count is the source of truth.
1. Create the stocktake
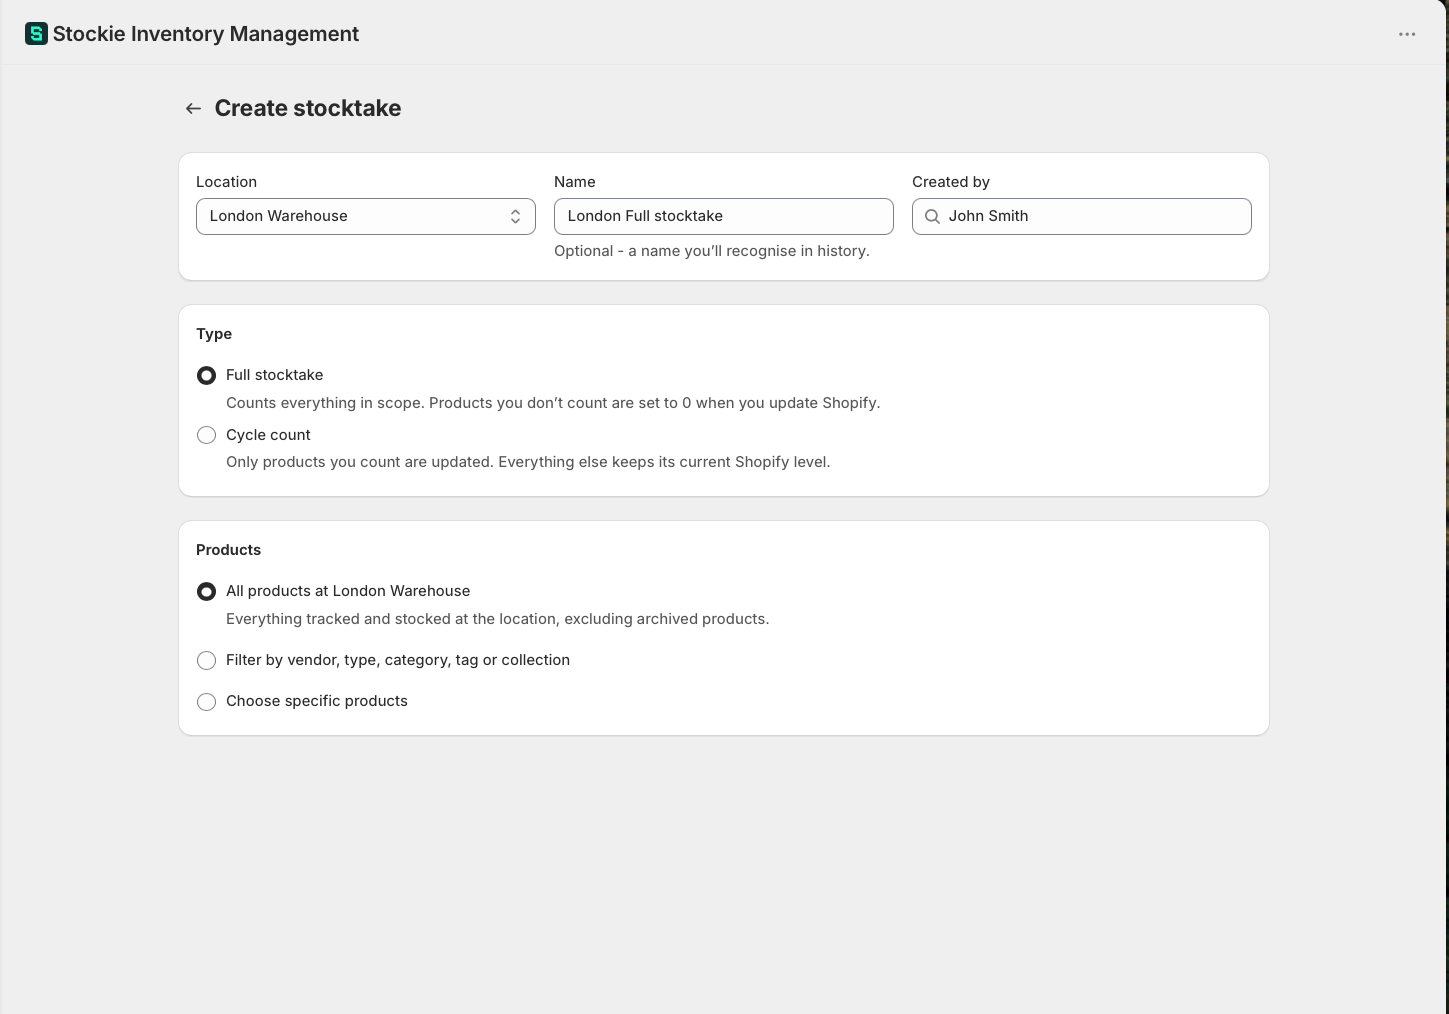
Go to Stocktakes and click Create stocktake.
- Location - the location you are counting. If another stocktake is already running at that location, Stockie warns you. Two counts over the same products produce conflicting adjustments.
- Name - optional, but it makes the count easier to find later.
- Created by - who is running it.
- Type - cycle count or full stocktake.
- Products - all products at that location, a filter by vendor, type, category, tag or collection, or specific products you pick.
- Counting options - draft and archived products are left out unless you tick them. Only include variants with stock on hand keeps variants Shopify shows at zero out of the list, which makes a long list much shorter. If you find stock for one of them on the shelf, scanning it adds it to the count.
A single stocktake covers up to 100,000 variants. If your scope is larger, Stockie tells you the count so you can narrow the filters or run separate cycle counts.
Stockie prepares the list first
Stockie builds the product list and fetches Shopify's quantities before counting opens. Preparing your stocktake shows how many variants have been checked so far. You can leave the page - preparation continues in the background, and the counting screen opens on its own once it is ready.
If it cannot finish you get We couldn't prepare this stocktake, and if it stops making progress for a few minutes you get This is taking longer than expected. Both offer Retry and Delete stocktake, and the stocktake carries a Needs attention badge on the Stocktakes list until it is sorted.
2. Count your stock
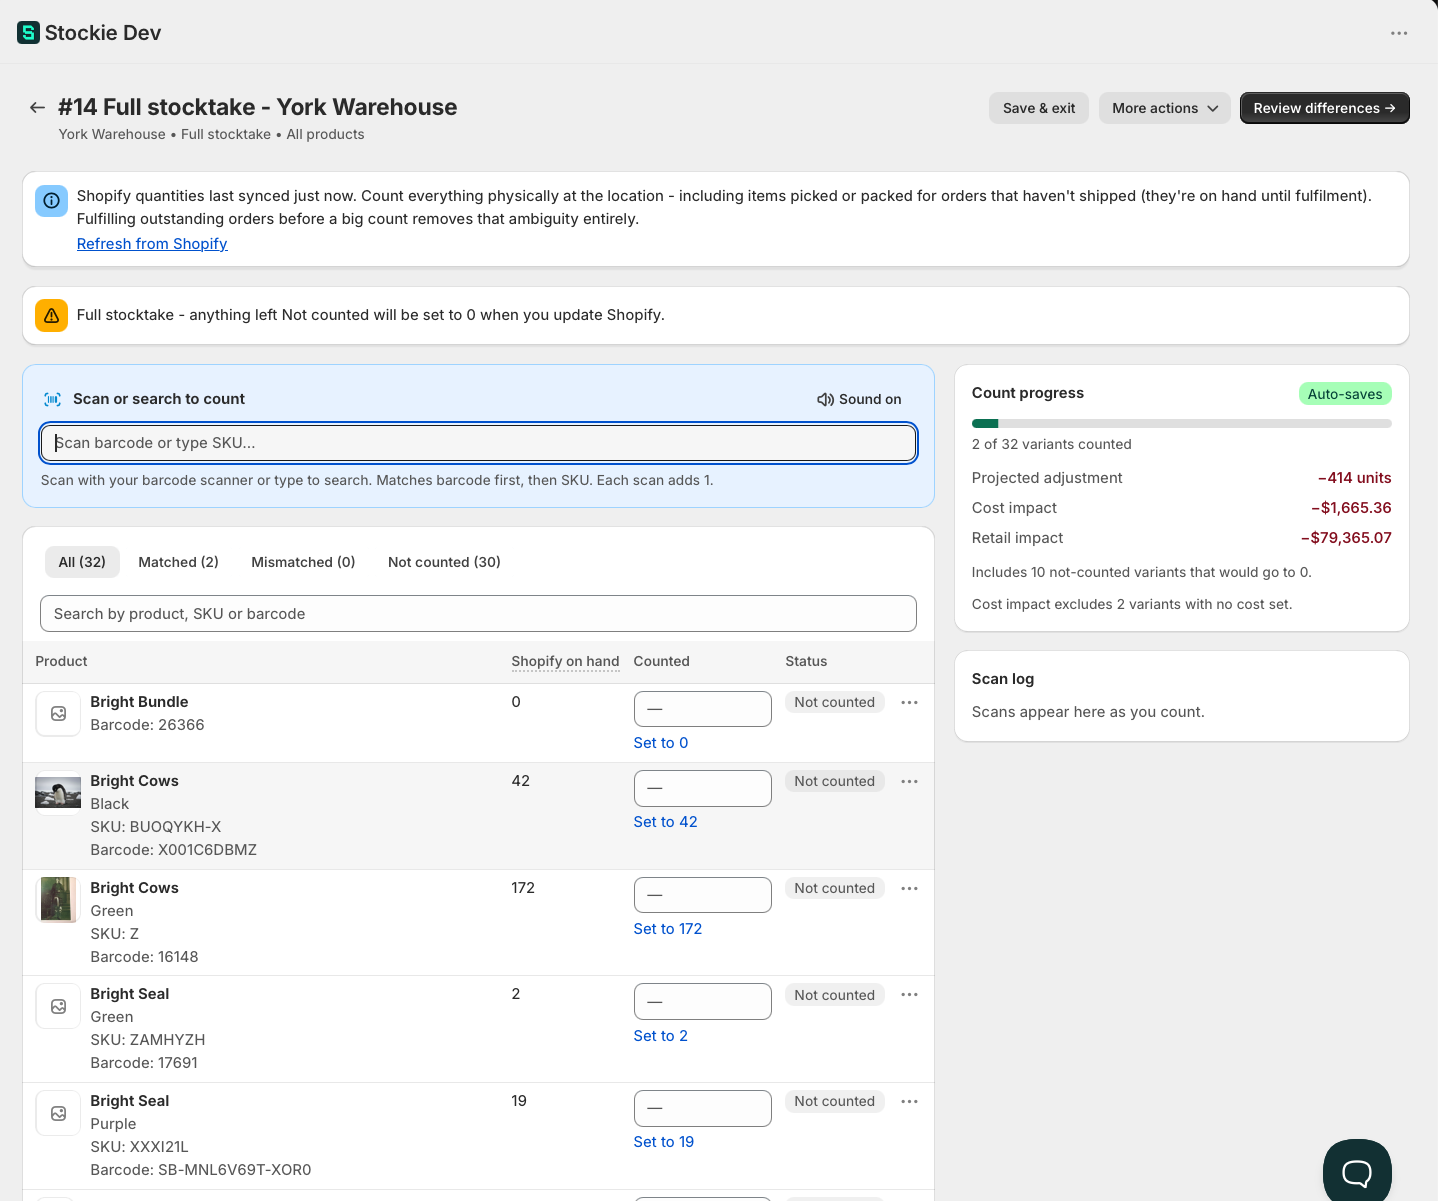
Count everything physically present at the location, including items picked or packed for orders that have not shipped - those are still on hand until fulfilment. Fulfilling outstanding orders before a big count removes the ambiguity. If quantities have moved since you started, use Refresh from Shopify. A count you come back to the next day refreshes itself when you open it.
There are two ways to enter counts:
- Scan or search. Put the cursor in the scan field and scan, or type a SKU. Each scan adds 1 to that variant. Matching goes barcode first, then SKU. Turn Sound on for a confirmation beep.
- Type directly. Enter the number in the Counted column, or use Set to [x] to match Shopify's figure when a product checks out.
Scan something that is in your store but not in this count and Stockie offers Add to count on the message it shows. That brings the variant in and counts the scan, so finding unexpected stock does not mean starting again.
As you go:
- Filter by All, Matched, Mismatched or Not counted to see where you are up to. An Excluded tab appears once you have excluded anything, and the search box narrows any tab by product, SKU or barcode.
- Count progress shows how many variants you have counted, plus the projected adjustment, cost impact and retail impact.
- The Scan log lists recent scans with an Undo on each, for misfires.
- Counts save as you go, so you can Save & exit and come back.
Counting with more than one person
Two or more people can count the same stocktake at the same time, each on their own device. Every device saves its own counts and picks up everyone else's every few seconds, so you all see the same numbers, the same Count progress, and an Also counting line naming the other staff currently counting.
Scans add up rather than overwrite: if two people scan the same variant, the count goes up by 2. A number typed into the Counted column replaces whatever was there, so it is worth agreeing who counts which shelf. Each counted line shows who last counted it and how long ago, and Undo in the scan log reverses that device's own scans only.
Counting on paper
If you would rather count away from a screen, Export count sheet gives you the list to work from:
- PDF to print and write on, or CSV to fill in on a computer
- The current view or all variants being counted, so you can print one section at a time
- Include Shopify on hand is on by default. Untick it for a blind count, where the sheet does not show what Shopify expects and whoever is counting has to record what they actually see
Key the figures in afterwards.
3. Review the differences
Click Review differences.
Review & update shows only the variants that need adjusting - the change, the adjust-by amount and the cost impact of each. Variants with no cost set are left out of the cost impact figure.
If a line looks wrong, Exclude drops it from the adjustment, or Back to counting lets you fix the number.
Stockie also refreshes Shopify's quantities as you arrive, so you are reviewing against current numbers. Syncing Shopify quantities stays up while that runs: you can keep reviewing, and the update to Shopify waits until the sync finishes.
Your physical count is compared against Shopify's on-hand quantity, and the adjustment is applied to available by the same amount.
Lines that changed while you were counting
If a sale or a receipt landed after you counted something, that line is flagged under Changed during count.
These have to be resolved before you can go any further - recount the line, confirm the shelf is still right, or exclude it. Confirm all clears them in one go, and means you are confirming your counted quantities are still what is physically on the shelf. Until none are left, Update Shopify inventory stays greyed out.
On a full stocktake, check what is uncounted
A full stocktake warns you here, naming how many variants are about to be set to 0. If you did not finish counting, Exclude all not counted leaves them alone instead.
Worth pausing over. This is the one step that can empty stock you never counted.
4. Update Shopify
Click Update Shopify inventory. A confirmation shows exactly what is about to change: how many variants, at which location, and the net unit and cost change.
If your count matched Shopify everywhere, there is nothing to write and the button reads Close stocktake instead.
Confirm, and Stockie writes the counted values to Shopify. Quantities update progressively, so a large count shows Updating Shopify inventory... with how many variants are done; you can leave the page and come back to it. Each adjustment is logged against the stocktake, so it is traceable in Shopify's own adjustment history.
Bundle products cannot be counted
Shopify works out a bundle's inventory from its components, so it will not accept a direct change to a bundle. Stockie checks for this before it changes anything, so nothing is written. You land back on the counting screen with The last inventory update was rejected and this message:
"Shopify calculates bundle inventory from its components, so bundle products can't be counted directly. Exclude the bundle products listed below from this stocktake and count their component products instead."
The bundle products are named under the message. Exclude each one from the count, count its component products instead, then review and update again.
5. After the count
The completed stocktake keeps a full record:
- Adjusted, Matched, Not counted and Excluded tabs, so you can see what happened to every variant in scope
- A summary of variants adjusted, unit variance, cost impact and retail impact
- Linked adjustments - the inventory adjustment the count created. Its quantities and reason stay owned by the stocktake, but you can edit its Notes once it has completed
- A timeline of when the stocktake was created, when its scope was prepared, when quantities were refreshed and when the update was applied
- Export CSV, which is emailed to you when it is ready
Your history lives on the Stocktakes list, filterable by all, completed and cancelled.